

Studios planning the installation of a power rack in 2026 should start with the finished training area: first, clarify the footprint, clearance, flooring, and transport route, then select the equipment and set the installation date. The rack's external dimensions alone are not enough, as the barbell, weight plate changes, and access require additional space. Before ordering, the installation instructions for the specific model must be compatible with the conditions at the site.
- Planning a studio power rack installation: First check the training area, flooring, and transport route, then the installation date.
- The Titanium Strength Power Cage E30 is suitable for planning a standalone rack area; a cable machine requires a different layout.
- Kraftathlet is relevant for studio operators who want to coordinate equipment specifications, delivery, and on-site installation.
- Equipment dimensions do not replace the space required for the barbell or the review of the installation instructions.
Why installation planning begins before equipment selection
A rack does not simply stand in an empty corner. You need a usable training area, a route for equipment parts to the installation site, and a process for assembly and acceptance. If any of these points change after ordering, the selected configuration may not necessarily fit the space.
This is especially true if you are planning a lat pulldown machine alongside the rack. Clarify the expansion during the layout planning; the guide to adding a lat pulldown to a power rack treats the retrofit as a separate decision. For the 2026 installation, what matters is what is actually intended to be installed on opening day, not just the basic equipment on the floor plan.
How do studios plan the installation of a power rack?
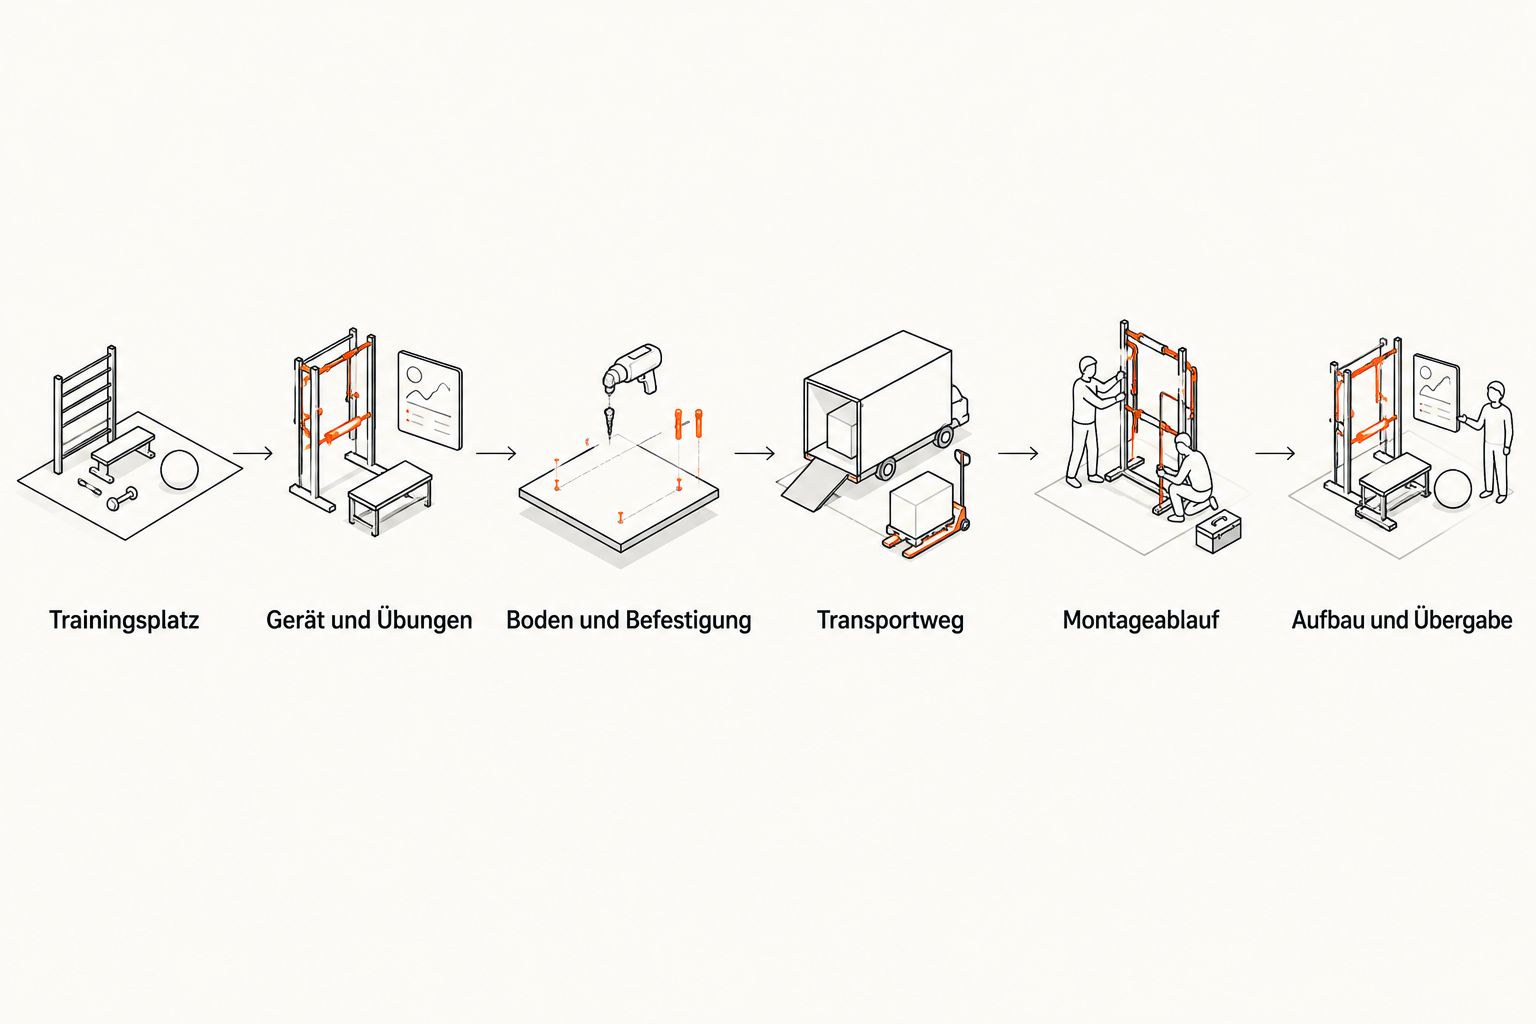
Plan in this order. Each step provides information you need for equipment selection or installation coordination. Do not skip checking the transport route and flooring: A rack that fits in the room on paper is not necessarily installable at the intended location.
- Define the training area. Mark the planned rack position on the floor plan. Do not just draw the frame, but also the areas where you will load the barbell, move to the equipment, and set the safety racks. Check doors, windows, fixed fixtures, and adjacent training areas at the actual site.
- Define the equipment and exercises. Decide whether you need a standalone power cage or a combination of a rack, Smith machine, and cable machine. Note the exercises and accessories intended from the first day of operation. Only then can the required access and movement areas be properly assessed.
- Check the flooring and anchoring. Record the flooring construction at the intended location. Whether anchoring is provided or required depends on the specific equipment and its installation instructions. Do not approve any anchoring method before equipment requirements and site conditions are clarified.
- Map the transport route. Check the delivery point, doors, hallways, stairs, elevator, and the final section to the installation area. Measure tight spots at the site and compare them with the packaging and component dimensions of the selected model. The external dimensions of the assembled rack do not answer this question.
- Schedule the installation process. Determine when the room will be clear, the flooring finished, and access available. Coordinate delivery, bringing the equipment in, assembly, and further work in the studio. The installation date belongs in the opening plan, not as a subsequent entry after the equipment list.
- Check assembly and handover. Compare the installed equipment with the ordered configuration and the manufacturer's instructions. Check whether accessories and safety components are present and can be operated at the intended location. Record any outstanding points before use.
This order prevents a typical confusion: The question of whether a rack fits in the room is not the same as the question of whether you can practically assemble and use it there. For a studio opening in 2026, both questions must be answered before the final appointment is agreed.
What belongs on the floor plan?
Draw in the actual intended operation. For free barbell training, the areas to the left and right of the bar must be included in the planning, not just the four posts. If you store weight plates on the rack, you also need access to these storage pegs. For a combined machine, working areas for the cable machine and Smith machine must also be included.
Then check the floor plan in the empty room. Mark the planned external edges and walk the routes between training areas, entrances, and permanently installed elements. This comparison does not replace a model drawing; however, it makes conflicts visible before you schedule the assembly. Plan the final position using the dimensional drawing and installation specifications of the selected equipment.
What must be established before delivery?
The installation site must be clearly defined. Note the room, position, and delivery route so that everyone involved means the same location. Also clarify when access will be available and whether other trades still need the area. An unfinished floor or an occupied transport route changes the installation process regardless of the rack model.
Request the specifications for the selected equipment that must be checked at the site: assembly drawing, component or packaging dimensions, installation specifications, and anchoring information. If any of this information is not available, the affected point remains open. An estimate based on product photos is not a basis for approving tight spots or anchoring.
Standalone power cage or combined trainer?
The two concepts require different planning. A power cage focuses the selection on the rack area and the intended accessories. A combined trainer additionally bundles functions such as a Smith machine and cable machine in one frame; for this, you must consider the operating areas of all planned stations. The decision is based on the planned exercises, not on the number of functions in the product name.
| Option | Best suited for | Specification in the product description | Planning disadvantage |
|---|---|---|---|
| Titanium Strength Elite Series Power Cage E30 | A standalone rack area in the studio | 300 kg rated load; posts with 75 × 75 mm; 27 positions | A cable machine is not included in the described functions. |
| Force USA G6 All-In-One Trainer | An area with a rack, Smith machine, and cable machine | Equipment dimensions 183 × 163 × 231 cm; 2 weight stacks of approximately 100 kg each | The additional stations require a separate check of the operating areas. |
The dimensions of the Force USA G6 describe the equipment, not the complete training area. Likewise, the load rating of the Titanium Strength Elite Series Power Cage E30 says nothing about the suitability of your flooring. Check both separately: equipment specifications from the manufacturer and site conditions in the studio. A specific clear space or anchoring cannot be derived from the product data provided here.
For a clearly defined area with free barbell exercises, the Titanium Strength Elite Series Power Cage E30 is the more suitable of the two described configurations. If the Smith machine and cable machine are intended to be part of the concept at the same equipment location, check the Force USA G6. This is a layout and functional decision, not a statement about which equipment can be installed without a site check.
Kraftathlet carries both equipment types in its range. For a robust configuration, provide the floor plan, intended use, and transport route information together. This allows the on-site installation to be related to the selected equipment, rather than just discussing an equipment order.


Why does power rack installation vary from studio to studio?
A fixed installation sequence helps, but the execution depends on the equipment and site. These factors change what must be clarified before ordering:
- Equipment type: A standalone cage and a trainer with a cable machine have different functions, components, and operating areas.
- Transport route: Stairs, elevators, doors, and hallways determine which component and packaging dimensions you need to check.
- Flooring construction: The installation specifications of the selected equipment must fit the intended installation area; anchoring is not determined as a blanket rule.
- Room occupancy: Adjacent stations, weight plate storage, and fixed fixtures influence the accessible training area.
- Opening date: Completion of the room, delivery, and installation must be in the same schedule.
Do not confuse technical equipment data with a site approval. A stated load capacity describes a product feature. Whether the intended space, its flooring, and the bringing-in process fit, you clarify with the documentation for the selected model and the actual conditions on site.
How do you coordinate delivery and installation for the studio opening?
Work backward from the planned 2026 start of operations. First, it must be established which rack configuration is needed on opening day. Then, clarify when the installation area will be ready and when the equipment can be delivered and assembled. The sequence protects the installation date from changes to the flooring, room occupancy, or access.
Clearly separate the responsibilities in the coordination: Who approves the installation site? Who ensures access for delivery? Who confirms the installation specifications of the specific equipment? These questions belong in the order and appointment coordination. Without answers to them, a delivery date is not yet a reliable installation date.
Kraftathlet describes delivery and on-site installation as part of its collaboration with studio operators. Therefore, do not just submit a wish list for equipment, but also the planned location and the opening date. For a rack area, the floor plan, use, and transport route are particularly crucial. If documentation on the flooring or bringing-in process remains unclear, clarify it before you firmly schedule the assembly.
What specific information does the coordination need?
A floor plan shows the planned position; photos and dimensions of tight spots complement the transport route. Record whether the rack stands alone or whether you intend accessories and additional stations at the same location. State the condition of the room at the intended installation date. This allows the equipment configuration and site conditions to be related to the same plan.
For multiple training areas, a total number of ordered racks is not enough. Assign each piece of equipment an intended location. Different room layouts may have different transport routes or access. The 2026 planning remains traceable if the floor plan, equipment list, and installation date use the same designations for the locations.
Does a power rack in the studio need to be anchored to the floor?
Whether a power rack needs to be anchored results from the installation specifications of the specific model and the conditions at the site. Do not derive an approval for a freestanding or anchored installation from the equipment designation alone. Check the instructions before you determine flooring work or the final position.
Are the external dimensions sufficient for studio planning?
No. External dimensions describe the frame, not the entire use: barbell, weight plate changes, access, and, if applicable, additional stations need space. Supplement the dimensional drawing of the selected equipment with the intended movement and operating areas on the floor plan.
You can find power racks, half racks, and rigs for installation in the studio in the category Power Racks & Strength Racks.
FAQ
How do I plan the power rack installation in the studio for 2026?
First define the training area, then check the equipment, flooring, and transport route, and subsequently coordinate the installation date. The installation instructions of the selected model are decisive for assembly and anchoring.
Can I place a power rack based on the product dimensions?
No, product dimensions alone are not enough for placement. Additionally, plan space for the barbell, weight plate changes, access, and the intended exercises.
Does every power rack in the studio need to be anchored?
There is no blanket rule for every power rack. What matters are the assembly instructions for the specific model and the tested conditions at the installation site.
What should I check before a power rack is delivered?
Check the installation site, access, and bottlenecks along the entire transport route. Compare them with the component and packaging specifications of the selected equipment.
Is a power cage or a cable machine better for my studio?
A power cage is suitable for a dedicated rack area; a combined cable machine is suitable if you are also planning a cable machine and additional stations at the same equipment location. Check the actual operating areas for both.
When should rack assembly be included in the opening plan?
Rack assembly should be included in the opening plan before ordering the equipment. Coordinate the completion of the room, access, delivery, and assembly to follow the same timeline.
What documents do I need for assembly coordination?
You need a floor plan showing the rack position, as well as information about the floor and transport route. Supplement this with the assembly and dimension documents for the selected model.
One final point
Mark the transport route on the same plan as the rack area. This way, in 2026, you will not only check where the finished equipment should stand, but also how its components will get there. An empty space is not yet a tested installation site.